
AppWidgetProvider
桌面挂件是能直接在桌面上操作的应用入口,通过AppWidgetProvider实现。涉及到RemoteViews和PendingIntent等技术点,这两个参考PendingIntent初识和RemoteView。
1、AppWidgetProvider
查看AppWidgetProvider的源码发现,AppWidgetProvider的本质就是四大组件之一的BroadcastReceiver。关于广播的使用详见BroadcastReceiver:广播接收器。
public class AppWidgetProvider extends BroadcastReceiver {
	...
    }
1.1、回调方法
onEnable() :当小部件第一次被添加到桌面时回调该方法,可添加多次,但只在第一次调用。对用广播的 Action 为 ACTION_APPWIDGET_ENABLE。
onUpdate(): 当小部件被添加时或者每次小部件更新时都会调用一次该方法,配置文件中配置小部件的更新周期 updatePeriodMillis,每次更新都会调用。对应广播 Action 为:ACTION_APPWIDGET_UPDATE 和 ACTION_APPWIDGET_RESTORED 。
onDisabled(): 当最后一个该类型的小部件从桌面移除时调用,对应的广播的 Action 为 ACTION_APPWIDGET_DISABLED。
onDeleted(): 每删除一个小部件就调用一次。对应的广播的 Action 为: ACTION_APPWIDGET_DELETED 。
onRestored(): 当小部件从备份中还原,或者恢复设置的时候,会调用,实际用的比较少。对应广播的 Action 为 ACTION_APPWIDGET_RESTORED。
onAppWidgetOptionsChanged(): 当小部件布局发生更改的时候调用。对应广播的 Action 为 ACTION_APPWIDGET_OPTIONS_CHANGED。
onReceive(): AppWidgetProvider 重写了该方法,用于分发具体的时间给上述的方法。
1.2、快速创建AppWidgetProvider
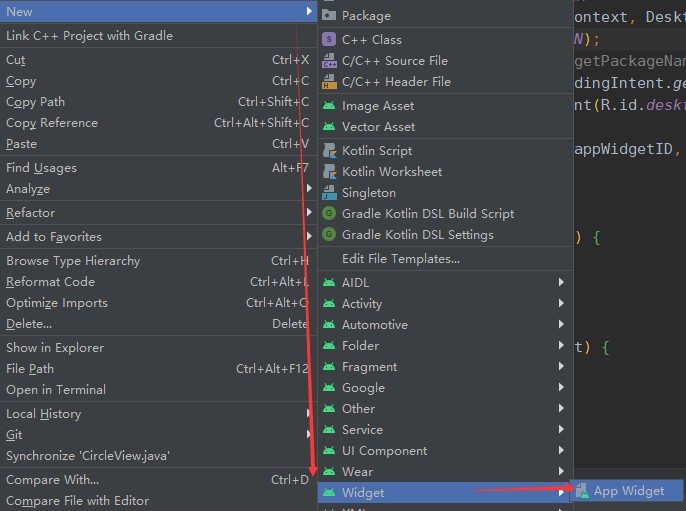
AndroidStudio开发工具已经有现成的AppWidgetProvider模板,快速创建一个AppWidgetProvider组件。后面还是一步一步来说明了解创建AppWidgetProvider的详细步骤。
2、创建AppWidgetProvider
这里手动创建实现AppWidgetProvider的几个步骤,以下几个步骤是创建AppWidgetProvider的标准流程。举一反三,可以做出复杂的桌面挂件。
2.1、布局
桌面挂件首先需要的就是界面,创建布局文件。后面通过RemoteViews加载该布局。还有AppWidgetProvider的xml配置也需要引用到该布局文件。
示例:
<?xml version="1.0" encoding="utf-8"?>
	<RelativeLayout xmlns:android="http://schemas.android.com/apk/res/android"
	    android:layout_width="match_parent"
	    android:layout_height="match_parent"
	    android:background="@color/colorPrimary">
	    <TextView
	        android:id="@+id/desktop_text"
	        android:layout_width="wrap_content"
	        android:layout_height="wrap_content"
	        android:layout_centerHorizontal="true"
	        android:layout_centerVertical="true"
	        android:gravity="center"
	        android:text="@string/desktop_wdiget_view" />
	</RelativeLayout>
2.2、xml配置
在res/xml/文件夹下新建一个desktop_widget_info.xml配置文件(名称随意,命名规范)。具体各种属性可以参考AppWidgetProviderInfo定义的declare-styleable属性:
<declare-styleable name="AppWidgetProviderInfo">
    <!-- Minimum width of the AppWidget. -->
    <attr name="minWidth"/>
    <!-- Minimum height of the AppWidget. -->
    <attr name="minHeight"/>
    <!-- Minimum width that the AppWidget can be resized to. -->
    <attr name="minResizeWidth" format="dimension"/>
    <!-- Minimum height that the AppWidget can be resized to. -->
    <attr name="minResizeHeight" format="dimension"/>
    <!-- Update period in milliseconds, or 0 if the AppWidget will update itself. -->
    <attr name="updatePeriodMillis" format="integer" />
    <!-- A resource id of a layout. -->
    <attr name="initialLayout" format="reference" />
    <!-- A resource id of a layout. -->
    <attr name="initialKeyguardLayout" format="reference" />
    <!-- A class name in the AppWidget's package to be launched to configure.
         If not supplied, then no activity will be launched. -->
    <attr name="configure" format="string" />
    <!-- A preview of what the AppWidget will look like after it's configured.
          If not supplied, the AppWidget's icon will be used. -->
    <attr name="previewImage" format="reference" />
    <!-- The view id of the AppWidget subview which should be auto-advanced.
         by the widget's host. -->
    <attr name="autoAdvanceViewId" format="reference" />
    <!-- Optional parameter which indicates if and how this widget can be
         resized. Supports combined values using | operator. -->
    <attr name="resizeMode" format="integer">
        <flag name="none" value="0x0" />
        <flag name="horizontal" value="0x1" />
        <flag name="vertical" value="0x2" />
    </attr>
    <!-- Optional parameter which indicates where this widget can be shown,
         ie. home screen, keyguard, search bar or any combination thereof.
         Supports combined values using | operator. -->
    <attr name="widgetCategory" format="integer">
        <flag name="home_screen" value="0x1" />
        <flag name="keyguard" value="0x2" />
        <flag name="searchbox" value="0x4" />
    </attr>
    <!-- Flags indicating various features supported by the widget. These are hints to the
     widget host, and do not actually change the behavior of the widget. -->
    <attr name="widgetFeatures" format="integer">
        <!-- The widget can be reconfigured anytime after it is bound -->
        <flag name="reconfigurable" value="0x1" />
        <!-- The widget is added directly by the app, and does not need to appear in
             the global list of available widgets -->
        <flag name="hide_from_picker" value="0x2" />
    </attr>
</declare-styleable>
一些比较重要的配置需要知道,比如小挂件的预览图,更新频率等。
①minWidth和minHeight:App Widget布局需要的最小区域。
②minResizeWidth和minResizeHeight:widget的最小尺寸。
③updatePeriodMillis:定义widget的更新频率。实际的更新时机不一定是精确的按照这个时间发生的。建议更新尽量不要太频繁,最好是低于1小时一次。或者可以在配置Activity里面供用户对更新频率进行配置。实际上,当updatePeriodMillis的值小于30分钟时,系统会自动将更新频率设为30分钟!
④initialLayout:指向widget的布局资源文件
⑤configure:可选属性,定义了widget的配置Activity。如果定义了该项,那么当widget创建时,会自动启动该Activity。
⑥autoAdvanceViewId:指定一个子View ID,表明该子View会自动更新。
⑦resizeMode:指定了widget的调整尺寸的规则。可取的值有:"horizontal","vertical","none"."horizontal"意味着widget可以水平拉伸,"vertical"意味着widget可以竖直拉伸,"none"意味着widget不能拉伸;默认值是"none"
⑧widgetCategory:指定了widget能显示的地方:能否显示在home Screen或lock screen或两者都可以。它的取值包括:"home_screen"和 "keyguard"
⑨initialKeyguardLayout:指向widget位于locksscreen中的布局文件。
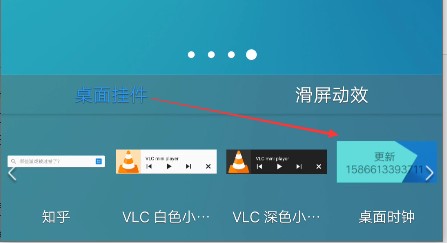
⑩previewImage:预览图,该预览图在用户选择widget时出现,如果没有提供,则会显示应用的图标。该字段对应在AndroidManifest.xml中receive的android:previewImage字段。
示例:
<?xml version="1.0" encoding="utf-8"?>
    <appwidget-provider xmlns:android="http://schemas.android.com/apk/res/android"
        android:initialKeyguardLayout="@layout/布局"
        android:initialLayout="@layout/布局"
        android:minWidth="100dp"
        android:minHeight="40dp"
        android:previewImage="@drawable/预览图"
        android:resizeMode="horizontal|vertical"
        android:updatePeriodMillis="86400000"
        android:widgetCategory="home_screen" />
2.3、继承AppWidgetProvider
关键的一步来了,继承AppWidgetProvider自定义桌面挂件。关键几步就是在onUpdate()方法中更新桌面挂件UI,通过RemoteViews。这里通用的做法是抽取出更新的方法,遍历int[] appWidgetIds所有小挂件。
有没有发现这里的做法是,只要是同种类型的小挂件都是一样的。毕竟有个appWidgetId可以作为判断依据,可以通过每个小挂件的id让同种类型的挂件不一样。
示例:
public class DesktopWidget extends AppWidgetProvider {
        private static final String TAG = "QUIBBLER";
        private static final String CLICK_ACTION = "com.easyicon.learnglide.desktopWidget.CLICK";
        public void onReceive(Context context, Intent intent) {
            super.onReceive(context, intent);//调用super.onReceive()方法
            String action = intent.getAction();
            if (CLICK_ACTION.equals(action)) {
                Toast.makeText(context, "DesktopWidget", Toast.LENGTH_SHORT).show();
            }
        }
        public void onUpdate(Context context, AppWidgetManager appWidgetManager, int[] appWidgetIds) {
            Log.e(TAG, Arrays.toString(appWidgetIds));
            for (int appWidgetId : appWidgetIds) {
                onWidgetUpdate(context, appWidgetManager, appWidgetId);
            }
        }
        private void onWidgetUpdate(Context context, AppWidgetManager appWidgetManager, int appWidgetID) {
            //创建RemoteViews
            RemoteViews remoteViews = new RemoteViews(context.getPackageName(), R.layout.desktop_view);

            Date date = Calendar.getInstance().getTime();
            SimpleDateFormat simpleDateFormat = new SimpleDateFormat("MM/dd/yy HH:mm:ss", Locale.CHINESE);
            remoteViews.setTextViewText(R.id.desktop_text, "当前时间:" + simpleDateFormat.format(date));

            // "窗口小部件"点击事件发送的Intent广播
            Intent intentClick = new Intent(context, DesktopWidget.class);//显示意图
            intentClick.setAction(CLICK_ACTION);

            //隐式意图必须设置Package,实际测试发现,如果使用隐式意图,在应用被杀掉时不响应广播
            //intentClick.setPackage(context.getPackageName());

            PendingIntent pendingIntent = PendingIntent.getBroadcast(context, 0, intentClick, PendingIntent.FLAG_UPDATE_CURRENT);
            remoteViews.setOnClickPendingIntent(R.id.desktop_text, pendingIntent);
            appWidgetManager.updateAppWidget(appWidgetID, remoteViews);
        }
}使用PendingIntent给RemoteViews指定id的View设置点击意图,关于PendingIntent的具体使用参考《PendingIntent初识》。
2.4、AndroidManifest
刚开始已经提到AppWidgetProvider是继承自BroadcastReceiver,四大组件都需要在AndroidManifest.xml中注册才能生效。
action必须添加android.appwidget.action.APPWIDGET_UPDATE。
meta-data必须指定android.appwidget.provider,以及resource指定第二步中定义的AppWidgetProvider xml配置。
示例:
<receiver
        android:name=".DesktopWidget">

        <intent-filter>
            <!--桌面挂件组件必须的action-->
            <action android:name="android.appwidget.action.APPWIDGET_UPDATE" />
            <!--自定义的点击广播-->
            <action android:name="com.easyicon.learnglide.desktopWidget.CLICK" />
        </intent-filter>

        <meta-data
            android:name="android.appwidget.provider"
            android:resource="@xml/desktop_widget_info" />
    </receiver>
3、坑点
遇到玄学的坑点不要慌,肯定网上已经有解决办法了!
3.1、忽略super.onReceive(context, intent)
千万不要忘了在重写onReceive()方法的时候调用super.onReceive(context, intent)方法,该方法是父类AppWidgetProvider的实现,内部已经对预定义的几种桌面小挂件事件进行了分发。
之所以“玄学”折腾了周末一晚上没搞定为什么自己设置的点击事件为什么没有onUpdate()更新,是因为重写onReceive()方法的时候忽略了super.onReceive(context, intent)。除非自己再对不同的广播进行判断分发重写。
看源码AppWidgetProvider中的onReceive方法都做了什么:
public void onReceive(Context context, Intent intent) {
        // Protect against rogue update broadcasts (not really a security issue,
        // just filter bad broacasts out so subclasses are less likely to crash).
        String action = intent.getAction();
        if (AppWidgetManager.ACTION_APPWIDGET_UPDATE.equals(action)) {
            Bundle extras = intent.getExtras();
            if (extras != null) {
                int[] appWidgetIds = extras.getIntArray(AppWidgetManager.EXTRA_APPWIDGET_IDS);
                if (appWidgetIds != null && appWidgetIds.length > 0) {
                    this.onUpdate(context, AppWidgetManager.getInstance(context), appWidgetIds);
                }
            }
        } else if (AppWidgetManager.ACTION_APPWIDGET_DELETED.equals(action)) {
            Bundle extras = intent.getExtras();
            if (extras != null && extras.containsKey(AppWidgetManager.EXTRA_APPWIDGET_ID)) {
                final int appWidgetId = extras.getInt(AppWidgetManager.EXTRA_APPWIDGET_ID);
                this.onDeleted(context, new int[] { appWidgetId });
            }
        } else if (AppWidgetManager.ACTION_APPWIDGET_OPTIONS_CHANGED.equals(action)) {
            Bundle extras = intent.getExtras();
            if (extras != null && extras.containsKey(AppWidgetManager.EXTRA_APPWIDGET_ID)
                    && extras.containsKey(AppWidgetManager.EXTRA_APPWIDGET_OPTIONS)) {
                int appWidgetId = extras.getInt(AppWidgetManager.EXTRA_APPWIDGET_ID);
                Bundle widgetExtras = extras.getBundle(AppWidgetManager.EXTRA_APPWIDGET_OPTIONS);
                this.onAppWidgetOptionsChanged(context, AppWidgetManager.getInstance(context),
                        appWidgetId, widgetExtras);
            }
        } else if (AppWidgetManager.ACTION_APPWIDGET_ENABLED.equals(action)) {
            this.onEnabled(context);
        } else if (AppWidgetManager.ACTION_APPWIDGET_DISABLED.equals(action)) {
            this.onDisabled(context);
        } else if (AppWidgetManager.ACTION_APPWIDGET_RESTORED.equals(action)) {
            Bundle extras = intent.getExtras();
            if (extras != null) {
                int[] oldIds = extras.getIntArray(AppWidgetManager.EXTRA_APPWIDGET_OLD_IDS);
                int[] newIds = extras.getIntArray(AppWidgetManager.EXTRA_APPWIDGET_IDS);
                if (oldIds != null && oldIds.length > 0) {
                    this.onRestored(context, oldIds, newIds);
                    this.onUpdate(context, AppWidgetManager.getInstance(context), newIds);
                }
            }
        }
    }
3.2、应用后台没有启动
应用没有启动似乎也不能正常点击响应广播,猜测可能是因为Android 8.0之后对广播进行了限制,比较现在只能动态注册广播接收器,AndroidManifest中静态注册receiver的时代已经过去了。而且AppWidgetProvider就是四大组件之一的Receiver嘛!
打开应用之后的一段时间是可以即时响应点击等广播,可以通过后台Service保活APP,保证桌面小挂件。
3.3、显示Intent
之所以一直点击不生效的另一个原始是使用了隐式意图的Intent,没有明确指定组件。
//隐式意图
    Intent intentClick = new Intent();
    intentClick.setAction(CLICK_ACTION);
    PendingIntent pendingIntent = PendingIntent.getBroadcast(context, 0, intentClick, PendingIntent.FLAG_UPDATE_CURRENT);
remoteViews.setOnClickPendingIntent(R.id.desktop_text, pendingIntent);折腾很一晚上也没搞清楚为什么点击没反应,原来问题出在这里。必须使用显示Intent
//显示意图
    Intent intentClick = new Intent(context, DesktopWidget.class);
intentClick.setAction(CLICK_ACTION);或者明确指定action包名:
//隐式意图
    Intent intentClick = new Intent();
    intentClick.setAction(CLICK_ACTION);
    //隐式意图必须设置Package,实际测试发现,如果使用隐式意图,在应用被杀掉时不响应广播
    intentClick.setPackage(context.getPackageName());
参考资料:
GitHub :baiqiantao/AppWidgetProvider(一篇值得参考的简单Demo)

评论 (1)
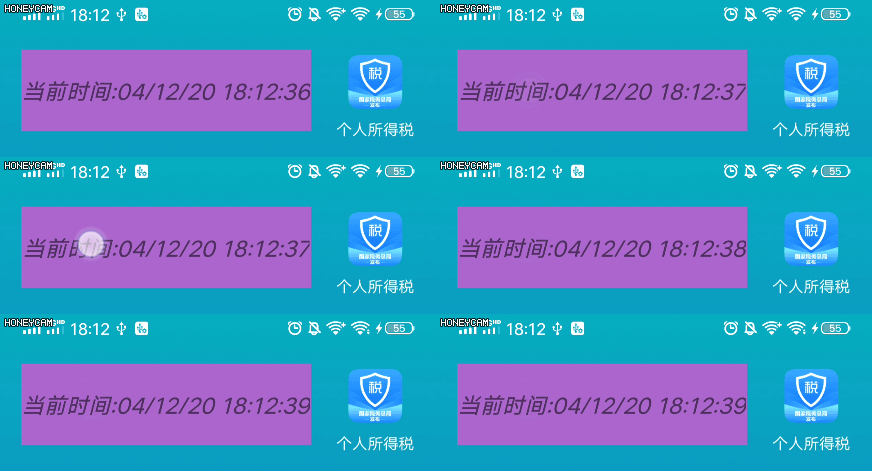
本篇博客最开的时钟效果是通过点击触发广播,在onReceive里面更新界面。
有一个想法能不能自动更新桌面挂件界面呢?感觉应该是可以的,而且因为RemoteViews是跨进程的界面,并非真正意义上的View。所以没有必须在主线程、UI线程通过Handler才能更新View的硬性要求。
于是,先简单实现一下,至于内存泄漏,耗电等后台问题暂不考虑。
开一个子线程定期去更新RemoteViews,只需要updateAppWidget(),至于前台怎么更新系统的事情,后台是在线程里发送的更新请求,但是这与前台无关,相信前台的RemoteViews真正界面是在主线程中更新的。
    new Thread(new Runnable() {
        @Override
        public void run() {
            while (true) {
                try {
                    Thread.sleep(1000);
                } catch (Exception e) {
                    Log.e(TAG, e.toString());
                }
                RemoteViews remoteViews = new RemoteViews(context.getPackageName(), R.layout.desktop_view);
                Date date = Calendar.getInstance().getTime();
                SimpleDateFormat simpleDateFormat = new SimpleDateFormat("MM/dd/yy HH:mm:ss", Locale.CHINESE);
                remoteViews.setTextViewText(R.id.desktop_text, "当前时间:" + simpleDateFormat.format(date));
                AppWidgetManager.getInstance(context)
                                .updateAppWidget(new ComponentName(context, DesktopWidget.class), remoteViews);
            }
        }
    }).start();
确实可以,桌面上的AppWidgetProvider时钟挂机自动刷新了!
但是如果把APP杀死,就没法更新挂件。