Glide源码调用流程分析
抽空挑灯夜战Glide源码,自己平时用过很多次glide(但是项目中一般不用),非常方便(glide用法见《Glide的基本用法》)。但是只会“拿来主义”并不是一个合格的程序员,还需要“刨根问底”,知道底层的实现原理,为什么人家能够做出这样牛掰的开源库,自己也可以学习积累其中的设计原理和思想,将来说不定也能找准合适的方向写一个。
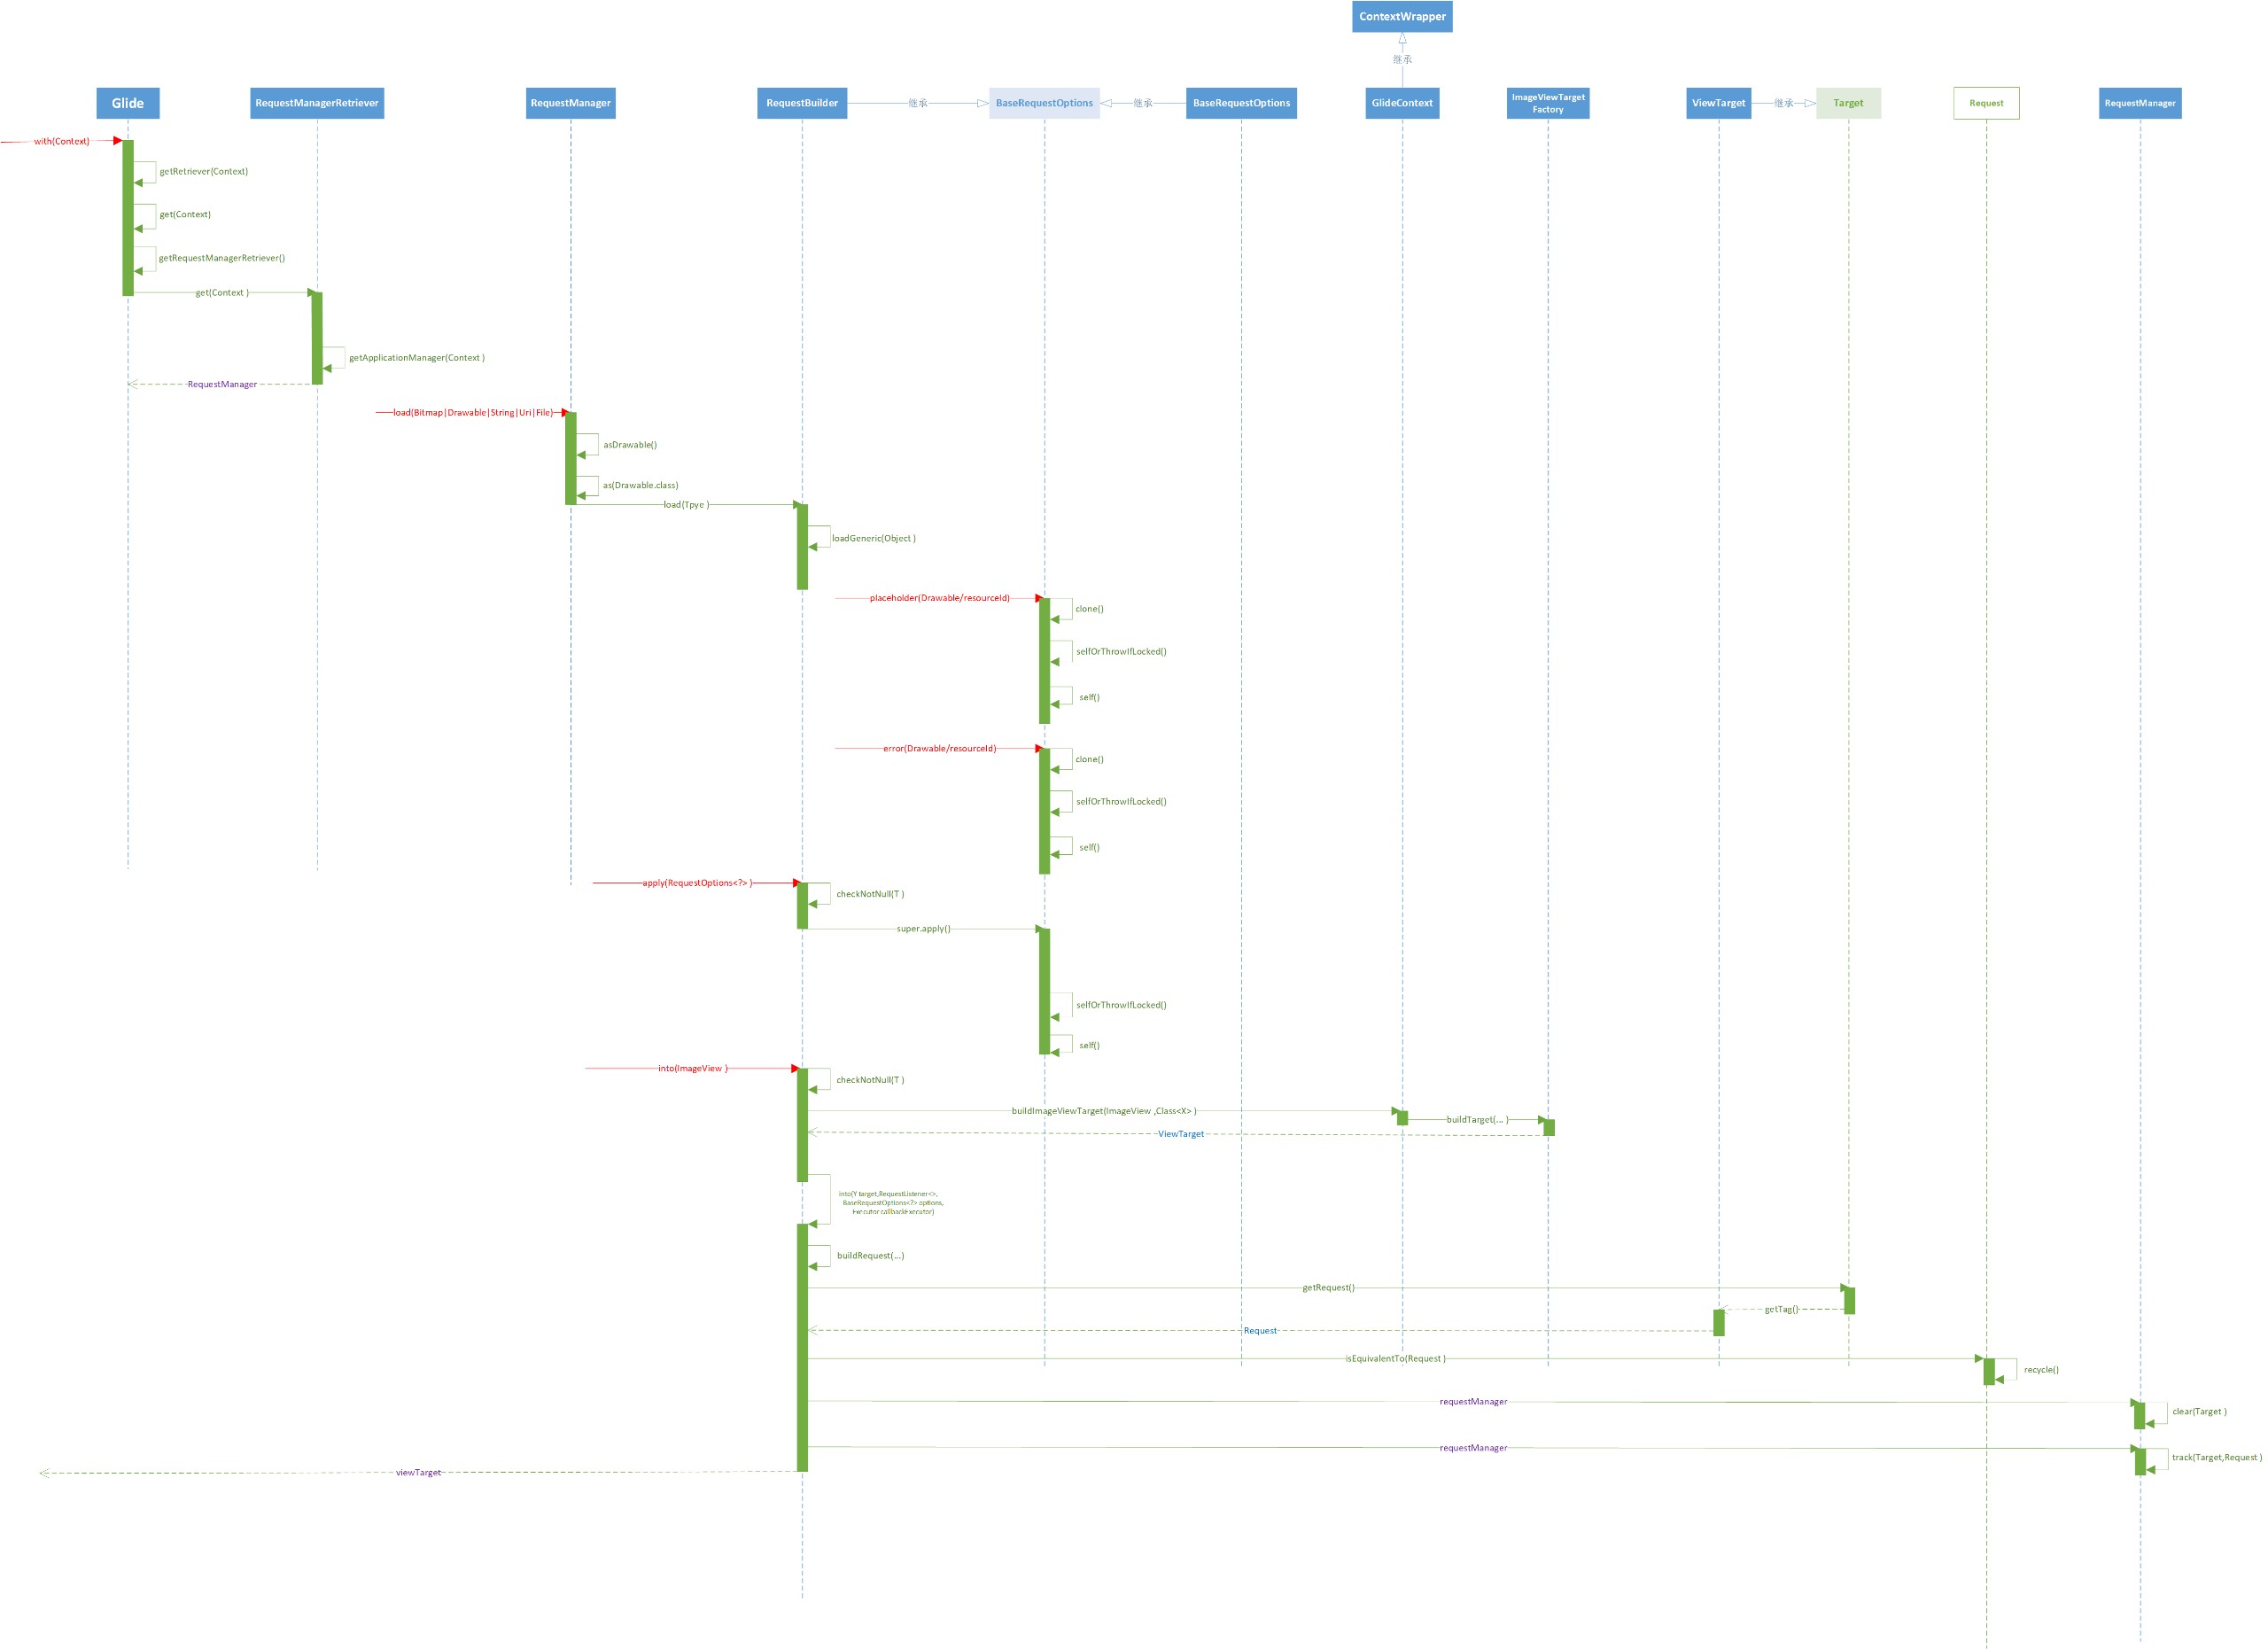
Glide的用法很简单,是因为Glide的设计非常棒。直接用下面的“链式”调用,一气呵成。先设置加载的目标图片,在设置加载过程中的占位图,还设置了加载图片失败时显示的提示图,最后还能在进行其它一些图片裁剪等选项设置。
Glide.with(context)
            .load(url)
            .centerCrop()
            .placeholder(drawable)
            .error(drawable)
            .into(mImageView);
1、入口:with()
先从with(...)方法入口开始,这是个重载的方法,可以传入的参数有多种:Context、Activity、Fragment、FragmentActivity、View。
public static RequestManager with(@NonNull FragmentActivity activity) {
        return getRetriever(activity).get(activity);
}重载方法中所能传入的各种类型的参数都能获取到Context,继续看getRetriever(Context )方法:
private static RequestManagerRetriever getRetriever(@Nullable Context context) {
        Preconditions.checkNotNull(
            context,
                "You cannot start a load on a not yet attached View or a Fragment where getActivity() "
                + "returns null (which usually occurs when getActivity() is called before the Fragment "
                + "is attached or after the Fragment is destroyed).");
        return Glide.get(context).getRequestManagerRetriever();
}先进行Context判空,再调用Glide的get(Context )方法获取Glide的实例:
/**
     * Get the singleton.
     */
    @NonNull
    public static Glide get(@NonNull Context context) {
      if (glide == null) {
        GeneratedAppGlideModule annotationGeneratedModule =
            getAnnotationGeneratedGlideModules(context.getApplicationContext());
        synchronized (Glide.class) {
          if (glide == null) {
            checkAndInitializeGlide(context, annotationGeneratedModule);
          }
        }
      }
      return glide;
    }
从这里可以看到Glide是单例的,很多优秀的开源库设计,都将入口主类设计为单例,这样所有的地方可以通过简单的调用链方式调用。
回到刚才的getRetriever(Context )方法,最后调用Glide单例对象的getRequestManagerRetriever()获取RequestManagerRetriever对象
public RequestManagerRetriever getRequestManagerRetriever() {
    return requestManagerRetriever;
}绕一圈,终于可以回到最初的with(...)方法,返回处调用RequestManagerRetriever的get(Context/Activity/... )方法,该方法是个重载方法,举个其中一个方法示例:
public RequestManager get(@NonNull Activity activity) {
      if (Util.isOnBackgroundThread()) {
        return get(activity.getApplicationContext());
      } else {
        assertNotDestroyed(activity);
        android.app.FragmentManager fm = activity.getFragmentManager();
        return fragmentGet(activity, fm, /*parentHint=*/ null, isActivityVisible(activity));
      }
    }
该方法返回RequestManager对象,这里才真正可以开始后面优雅的“链式”方法调用。因为每一个RequestManager方法都返回this自身,这样一个方法接着一个方法调用。
接下来可以继续调用返回的this对象(RequestBuilder)中的方法,设置图片加载中的一些显示参数。
2、资源:load(String、File、Integer、URL、Uri、Bitmap...)
进入load(...)方法,该方法也有很多重载,Android的图片资源获取有多种:传入int类型的资源id、Drawerable类型、Bitmap、File图片文件、Url网络图片等等。
public RequestBuilder<Drawable> load(String、File、Integer、URL、Uri、Bitmap...) {
      return asDrawable().load(...);
}调用asDrawable()方法返回RequestBuilder<Drawable>对象
public RequestBuilder<Drawable> asDrawable() {
      return as(Drawable.class);
    }

    public <ResourceType> RequestBuilder<ResourceType> as(
        @NonNull Class<ResourceType> resourceClass) {
      return new RequestBuilder<>(glide, this, resourceClass, context);
}接着调用RequestBuilder的load(...)方法传入需要加载的资源(String、File、Integer、URL、Uri、Bitmap...等类型)
public RequestBuilder<TranscodeType> load(@Nullable File file) {
      return loadGeneric(file);
}为什么能传入这么多类型的参数,难道需要一长串的类型挨个判断,并不是!看看loadGeneric(Object model)方法,参数为Object类型,当然可以接受任何类型的Java对象作为参数。
private RequestBuilder<TranscodeType> loadGeneric(@Nullable Object model) {
      this.model = model;
      isModelSet = true;
      return this;
    }
返回this,继续后面的RequestBuilder方法调用链
3、可选
Glide调用链中有一些方法是可选的,比如:placeholder、error、diskCacheStrategy(DiskCacheStrategy)、skipMemoryCache(boolean)等方法,用于设置RequestBuilder加载图片的选项。
3.1、placeholder(Drawable/resourceId)
设置ImageView的占位图,图片加载过程中将先显示这个placeHolder中设置的图片,因为是占位图,不能再没有了,所以只能有两种类型的参数,都是本地资源一个是Drawable对象,另一个是资源id。
public T placeholder(@DrawableRes int resourceId) {
      if (isAutoCloneEnabled) {
        return clone().placeholder(resourceId);
      }
      this.placeholderId = resourceId;
      fields |= PLACEHOLDER_ID;
      placeholderDrawable = null;
      fields &= ~PLACEHOLDER;
      return selfOrThrowIfLocked();
    }
3.2、error(Drawable/resourceId)
Glide图片加载失败的时候给ImageView设置,以提示用户图片加载失败。
public T error(@DrawableRes int resourceId) {
      if (isAutoCloneEnabled) {
        return clone().error(resourceId);
      }
      this.errorId = resourceId;
      fields |= ERROR_ID;
      this.errorPlaceholder = null;
      fields &= ~ERROR_PLACEHOLDER;
      return selfOrThrowIfLocked();
    }
4、目标:into(ImageView )
最后在RequestBuilder调用链末尾,调用into(ImageView )设置需要加载图片的ImageView对象。
public ViewTarget<ImageView, TranscodeType> into(@NonNull ImageView view) {
      Util.assertMainThread();
      Preconditions.checkNotNull(view);
      ...
      return into(
          glideContext.buildImageViewTarget(view, transcodeClass),
          requestOptions,
          Executors.mainThreadExecutor());
}①Util.assertMainThread()判断Glide是否在主线程,所以Glide的调用要在主线程。
public static boolean isOnMainThread() {
      return Looper.myLooper() == Looper.getMainLooper();
    }
②注意最后方法中将传入的ImageView封装为Target类型的对象,也就是ViewTarget。这里层层调用借助了ImageViewTargetFactory就不展开了。
③值得一提的是这里的GlideContext继承自ContextWrapper,是Glide自己将传入的Context封装。
public class GlideContext extends ContextWrapper {
      ...
}第一个into(ImageView )方法只是给开发者的一个极简入口,真正还有一个复杂封装的into(...)方法,将前面“调用链”层层调用最终设置好的RequestBuilder和ImageView关联起来:
private <Y extends Target<TranscodeType>> Y into(Y target,
      RequestListener<TranscodeType> targetListener,
      BaseRequestOptions<?> options,
      Executor callbackExecutor) {
      ...
      Request request = buildRequest(target, targetListener, options, callbackExecutor);
      ...
      requestManager.clear(target);
      target.setRequest(request);
      requestManager.track(target, request);
      return target;
  }
由RequestTracker开启Request中封装的获取和图片加载请求
synchronized void track(@NonNull Target<?> target, @NonNull Request request) {
      targetTracker.track(target);
      requestTracker.runRequest(request);
    }
加载获取到图片后,设置给封装在target中的ImageView。至于其中的如何获取图片、图片缓存、显示等逻辑以后继续颇析。
推荐阅读: