EventBus源码分析(一):构造及订阅
EventBus源码分析(一):构造及订阅
通过一文EventBus初步使用,了解了EventBus的使用。光了解是不够的,深入源码才算熟悉。EventBus源码不多,适合开发者精读学习,仅代码就1800余行(使用SourceCounter统计)。

1、构造EventBus实例
项目开发中,一般使用EventBus类中的getDefault()静态方法获取全局总线实例。
EventBus eventBus = EventBus.getDefault();
1.1、默认单例
getDefault()是标准的获取单例方法,获取EventBus库中实现的静态单例。关于单例详见单例的五种方式一文。
    static volatile EventBus defaultInstance;

    /** Convenience singleton for apps using a process-wide EventBus instance. */
    public static EventBus getDefault() {
        EventBus instance = defaultInstance;
        if (instance == null) {
            synchronized (EventBus.class) {
                instance = EventBus.defaultInstance;
                if (instance == null) {
                    instance = EventBus.defaultInstance = new EventBus();
                }
            }
        }
        return instance;
    }
1.2、构造方法
用来构造EventBus的构造方法是这个无参构造方法,通过该默认构造方法也可以构造出一个EventBus实例,不过不推荐,应使用官方提供的getDefault()方法。
    public EventBus() {
        this(DEFAULT_BUILDER);
}默认构造方法中使用默认的EventBusBuilder构造器构造EventBus实例。注意到这个构造方法默认包访问权限。

开发者也就不能直接通过EventBus构造函数设置EventBusBuilder,并作为参数构造EventBus。有没有方法自定义设置EventBus呢?有的,继续看下面1.3节。
    EventBus(EventBusBuilder builder) {
        logger = builder.getLogger();
        subscriptionsByEventType = new HashMap<>();
        typesBySubscriber = new HashMap<>();
        stickyEvents = new ConcurrentHashMap<>();
        mainThreadSupport = builder.getMainThreadSupport();
        mainThreadPoster = mainThreadSupport != null ? mainThreadSupport.createPoster(this) : null;
        backgroundPoster = new BackgroundPoster(this);
        asyncPoster = new AsyncPoster(this);
        indexCount = builder.subscriberInfoIndexes != null ? builder.subscriberInfoIndexes.size() : 0;
        subscriberMethodFinder = new SubscriberMethodFinder(builder.subscriberInfoIndexes,
                builder.strictMethodVerification, builder.ignoreGeneratedIndex);
        logSubscriberExceptions = builder.logSubscriberExceptions;
        logNoSubscriberMessages = builder.logNoSubscriberMessages;
        sendSubscriberExceptionEvent = builder.sendSubscriberExceptionEvent;
        sendNoSubscriberEvent = builder.sendNoSubscriberEvent;
        throwSubscriberException = builder.throwSubscriberException;
        eventInheritance = builder.eventInheritance;
        executorService = builder.executorService;
    }
1.3、建造者 EventBusBuilder
EventBusBuilder也不是公开的构造方法。开发者不能直接通过构造方法创建EventBusBuilder实例。
    EventBusBuilder() {
}EventBus类中有默认的EventBusBuilder构造器DEFAULT_BUILDER用来创建默认的EventBus实例。
private static final EventBusBuilder DEFAULT_BUILDER = new EventBusBuilder();
但是,在EventBus类中却提供的静态方法可以创建并获取EventBusBuilder实例:
    public static EventBusBuilder builder() {
        return new EventBusBuilder();
}通过建造者模式配置各种EventBus特性配置。建造者模式也是很多开源库里经常用到的设计模式之一,比如OkHttp中Request请求的构造就是通过建造者来配置构造请求。
    private final static ExecutorService DEFAULT_EXECUTOR_SERVICE = Executors.newCachedThreadPool();
    boolean logSubscriberExceptions = true;
    boolean logNoSubscriberMessages = true;
    boolean sendSubscriberExceptionEvent = true;
    boolean sendNoSubscriberEvent = true;
    boolean throwSubscriberException;
    boolean eventInheritance = true;
    boolean ignoreGeneratedIndex;
    boolean strictMethodVerification;
    ExecutorService executorService = DEFAULT_EXECUTOR_SERVICE;
    List<Class<?>> skipMethodVerificationForClasses;
    List<SubscriberInfoIndex> subscriberInfoIndexes;
    Logger logger;
    MainThreadSupport mainThreadSupport;
配置好EventBusBuilder建造者,那么EventBusBuilder如何使用建造者呢?毕竟EventBus的有参构造方法是私有的,还好EventBusBuilder建造者提供了一个installDefaultEventBus()方法,初始化默认的EventBus单例,注意不是“替换”!如果EventBus已有单例存在,那么调用该方法会报错。
    public EventBus installDefaultEventBus() {
        synchronized (EventBus.class) {
            if (EventBus.defaultInstance != null) {
                throw new EventBusException("Default instance already exists." +
                        " It may be only set once before it's used the first time to ensure consistent behavior.");
            }
            EventBus.defaultInstance = build();
            return EventBus.defaultInstance;
        }
}或者直接通过EventBusBuilder建造者的build()方法创建一个新的EventBus实例:
    /** Builds an EventBus based on the current configuration. */
    public EventBus build() {
        return new EventBus(this);
    }
1.4、小结
了EventBus的构造源码,可以知道获取EventBus实例的四种方法:
①EventBus.getDefault() //getDefault()获取默认的全局总线
②new EventBus() //EventBus的两个构造方法只有这个默认的可以直接使用
③EventBus.builder().installDefaultEventBus() //只能设置一次,而且必须先于getDefault()设置
④EventBus.builder().build() //使用EventBusBuilder建造自定义EventBus实例
2、注册订阅者
EventBus事件总线已经拿到了,接下来就该注册订阅者。EventBus库内部通过以下几个映射维护订阅者和事件的关系。
    //维护 [事件类型] 到 [订阅者]的映射。某个[事件类型],对应一个或者多个[订阅者]。
    private final Map<Class<?>, CopyOnWriteArrayList<Subscription>> subscriptionsByEventType;

    //维护[订阅者] 到 [订阅事件类型]的映射。一个[订阅者]可以订阅一个或多个[事件类型]。
    private final Map<Object, List<Class<?>>> typesBySubscriber;

    //记录[事件类型] 到 对应[粘性事件]的映射 。注册粘性订阅者时,会将[粘性事件]再次发送给订阅该[类型事件]的[订阅者]。
    private final Map<Class<?>, Object> stickyEvents;
在开始阅读源码之前,最好先要知道这一点,方便后面代码的理解。
2.1、注册订阅者
EventBus的注册流程比解注册要稍微复杂一些,因为涉及到注册对象注解的解析,订阅者、事件类型相互之间的关系映射。整体流程如下:
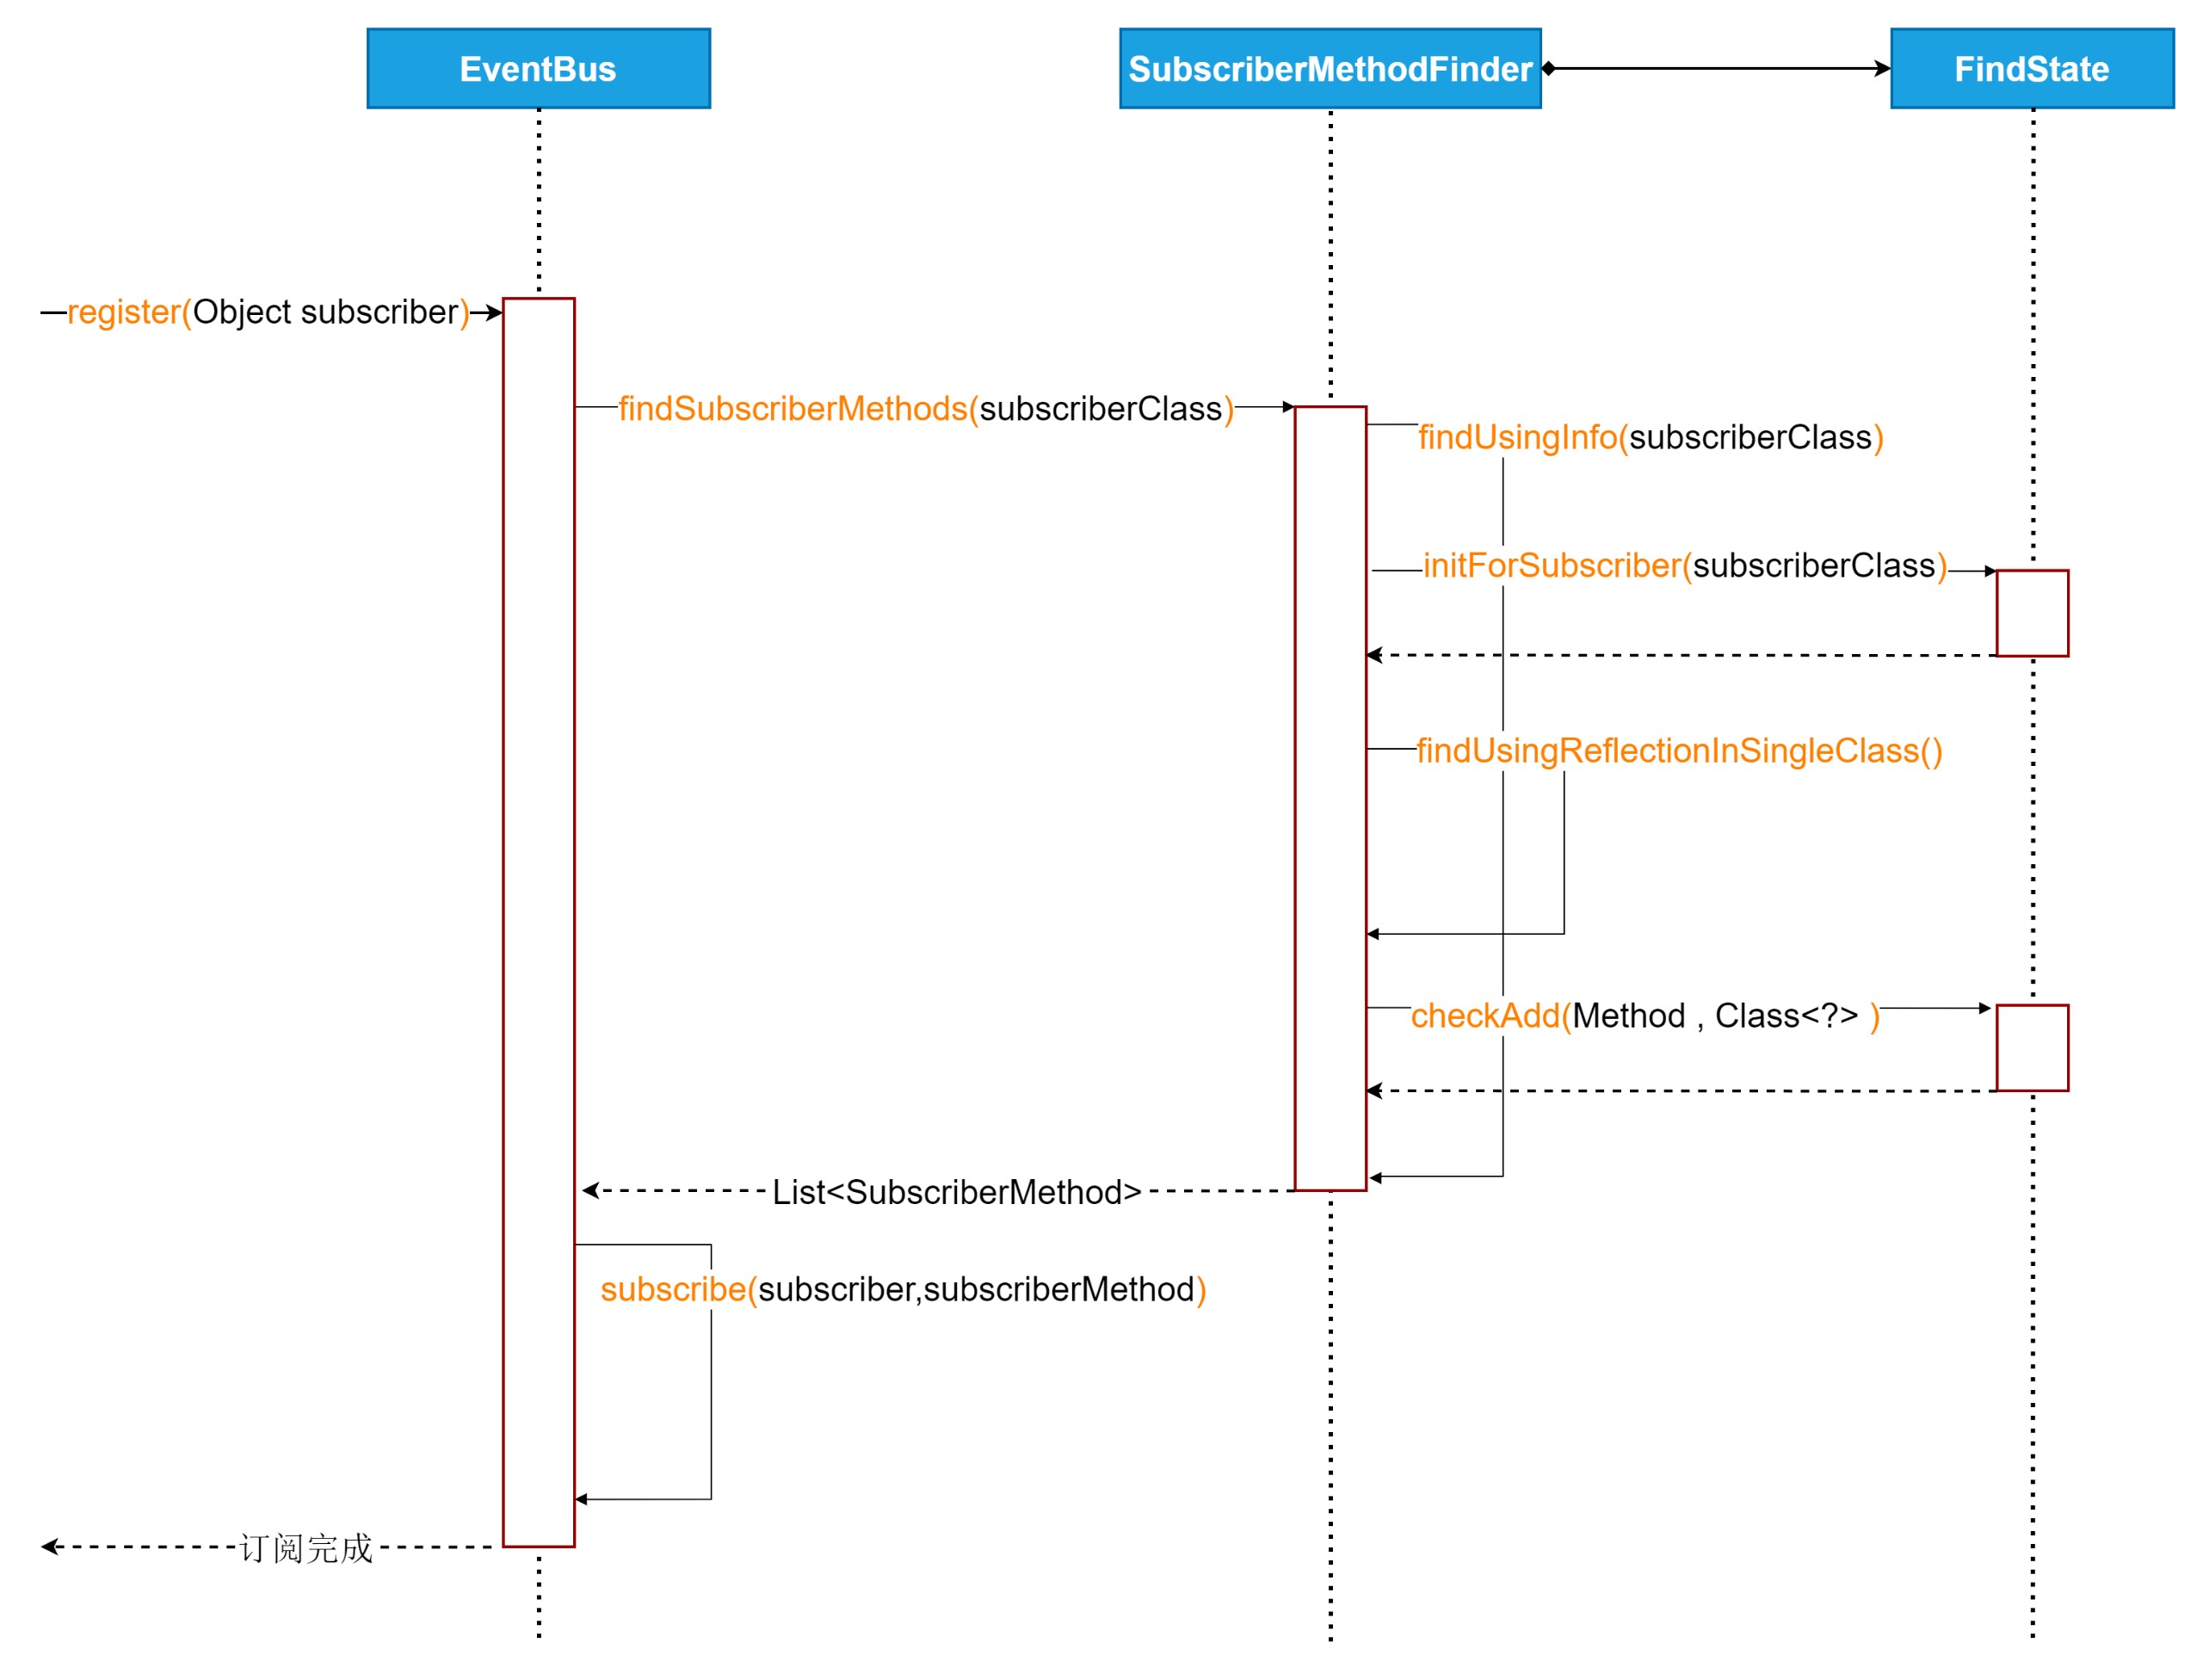
从register(Object subscriber)方法开始看:
    public void register(Object subscriber) {
        Class<?> subscriberClass = subscriber.getClass();
        List<SubscriberMethod> subscriberMethods = subscriberMethodFinder.findSubscriberMethods(subscriberClass);
        synchronized (this) {
            for (SubscriberMethod subscriberMethod : subscriberMethods) {
                subscribe(subscriber, subscriberMethod);
            }
        }
}借助SubscriberMethodFinder类,解析订阅对象中的用@Subscribe注解的订阅方法,调用findSubscriberMethods(Class<?> subscriberClass)方法:
    List<SubscriberMethod> findSubscriberMethods(Class<?> subscriberClass) {
        List<SubscriberMethod> subscriberMethods = METHOD_CACHE.get(subscriberClass);
        if (subscriberMethods != null) {
            return subscriberMethods;
        }
        //默认false
        if (ignoreGeneratedIndex) {
            subscriberMethods = findUsingReflection(subscriberClass);
        } else {
            //所以通常执行这里
            subscriberMethods = findUsingInfo(subscriberClass);
        }
        if (subscriberMethods.isEmpty()) {
            throw new EventBusException("Subscriber " + subscriberClass
                    + " and its super classes have no public methods with the @Subscribe annotation");
        } else {
            METHOD_CACHE.put(subscriberClass, subscriberMethods);
            return subscriberMethods;
        }
}构造EventBus时使用默认的EventBusBuilder,ignoreGeneratedIndex默认配置为false,所以执行findUsingInfo(Class<?> subscriberClass)方法:
    private List<SubscriberMethod> findUsingInfo(Class<?> subscriberClass) {
        //借助FindState来遍历查找注解,这里用到了对象池,从对象池中获取FindState实例
        FindState findState = prepareFindState();
        //初始化FindState ,findState.clazz初始为null
        findState.initForSubscriber(subscriberClass);
        while (findState.clazz != null) {
            findState.subscriberInfo = getSubscriberInfo(findState);
            if (findState.subscriberInfo != null) {
                SubscriberMethod[] array = findState.subscriberInfo.getSubscriberMethods();
                for (SubscriberMethod subscriberMethod : array) {
                    if (findState.checkAdd(subscriberMethod.method, subscriberMethod.eventType)) {
                        findState.subscriberMethods.add(subscriberMethod);
                    }
                }
            } else {
                //所以走这里的路基
                findUsingReflectionInSingleClass(findState);
            }
            findState.moveToSuperclass();
        }
        //从FindState中拿出找到的List<SubscriberMethod>,并释放FindState到资源池。
        return getMethodsAndRelease(findState);
}值得学习的是,为了提高性能,这里用到了对象池以复用FindState实例。对象池可以模仿小巧的对象池Pools一文的实现。
    private static final int POOL_SIZE = 4;
    private static final FindState[] FIND_STATE_POOL = new FindState[POOL_SIZE];
在findUsingInfo(Class<?> subscriberClass)方法开始调用prepareFindState()获取对象池中的对象,如果没有可用的实例就直接创建新的:
    private FindState prepareFindState() {
        synchronized (FIND_STATE_POOL) {
            for (int i = 0; i < POOL_SIZE; i++) {
                FindState state = FIND_STATE_POOL[i];
                if (state != null) {
                    FIND_STATE_POOL[i] = null;
                    return state;
                }
            }
        }
        return new FindState();
}最后再通过getMethodsAndRelease(FindState findState)方法返回订阅对象的注解方法解析结果,并且释放对象回到对象池(如果没满)。
    private List<SubscriberMethod> getMethodsAndRelease(FindState findState) {
        List<SubscriberMethod> subscriberMethods = new ArrayList<>(findState.subscriberMethods);
        findState.recycle();
        synchronized (FIND_STATE_POOL) {
            for (int i = 0; i < POOL_SIZE; i++) {
                if (FIND_STATE_POOL[i] == null) {
                    FIND_STATE_POOL[i] = findState;
                    break;
                }
            }
        }
        return subscriberMethods;
}接着findUsingInfo(Class<?> subscriberClass)方法继续看,内部调用findUsingReflectionInSingleClass(FindState findState)方法真正完成了注解解析操作
    private void findUsingReflectionInSingleClass(FindState findState) {
        Method[] methods;
        try {
            // This is faster than getMethods, especially when subscribers are fat classes like Activities
            methods = findState.clazz.getDeclaredMethods();
        } catch (Throwable th) {
            ...
        }
        for (Method method : methods) {
            int modifiers = method.getModifiers();
            if ((modifiers & Modifier.PUBLIC) != 0 && (modifiers & MODIFIERS_IGNORE) == 0) {
                Class<?>[] parameterTypes = method.getParameterTypes();
                if (parameterTypes.length == 1) {
                    Subscribe subscribeAnnotation = method.getAnnotation(Subscribe.class);
                    //添加解析出的订阅方法到FindState中
                } else if (strictMethodVerification && method.isAnnotationPresent(Subscribe.class)) {
                    String methodName = method.getDeclaringClass().getName() + "." + method.getName();
                    throw new EventBusException("@Subscribe method " + methodName +
                            "must have exactly 1 parameter but has " + parameterTypes.length);
                }
            } else if (strictMethodVerification && method.isAnnotationPresent(Subscribe.class)) {
                String methodName = method.getDeclaringClass().getName() + "." + method.getName();
                throw new EventBusException(methodName +
                        " is a illegal @Subscribe method: must be public, non-static, and non-abstract");
            }
        }
} 从上面的方法可以看到几个开发注意事项,这也是EventBus的硬性规定。相信很多开发者都曾经遇到过:
①注解的订阅方法必须有且仅有一个参数,多了或者少了都会抛出异常提示:must have exactly 1 parameter...
②注解的方法必须是public,否则抛出异常提示:@Subscribe method: must be public...
解析完后,回到findSubscriberMethods(Class<?> subscriberClass)方法,会发现还有一处限定:
③注册的对象中没有找到注解的订阅方法,则抛出:have no public methods with the @Subscribe annotation...
绕了一大圈,再回到最初的register(Object subscriber)方法,通过SubscriberMethodFinder找到注册对象中的所有订阅方法。
    public void register(Object subscriber) {
        Class<?> subscriberClass = subscriber.getClass();
        List<SubscriberMethod> subscriberMethods = subscriberMethodFinder.findSubscriberMethods(subscriberClass);
        synchronized (this) {
            for (SubscriberMethod subscriberMethod : subscriberMethods) {
                //执行订阅
                subscribe(subscriber, subscriberMethod);
            }
        }
}现在对它们进行订阅,执行subscribe(Object subscriber, SubscriberMethod subscriberMethod)方法,看着比较多,且一行一行分析:
    // Must be called in synchronized block
    private void subscribe(Object subscriber, SubscriberMethod subscriberMethod) {
        //事件类型,也就是注册方法的参数类型
        Class<?> eventType = subscriberMethod.eventType;

        //用订阅者和其中的订阅方法构造一个订阅对象
        Subscription newSubscription = new Subscription(subscriber, subscriberMethod);

        //从已注册的事件映射中找一找,是不是已经有对象订阅了该事件
        CopyOnWriteArrayList<Subscription> subscriptions = subscriptionsByEventType.get(eventType);
        if (subscriptions == null) {
            //当前事件类型还没有被订阅过,那么新建一个空订阅对象集合,并添加到映射中。
            subscriptions = new CopyOnWriteArrayList<>();
            subscriptionsByEventType.put(eventType, subscriptions);
        } else {
            //已经有对象订阅过这个事件,那么看看订阅这个事件的对象集合中是否有当前正在注册的对象
            if (subscriptions.contains(newSubscription)) {
                //如果这个对象已经进行过订阅注册操作,那么不允许重复订阅,抛出异常。
                throw new EventBusException("Subscriber " + subscriber.getClass() + " already registered to event "
                        + eventType);
            }
        }

        //按照订阅方法设置的优先级,将订阅对象插入到这个事件的订阅对象队列中。
        int size = subscriptions.size();
        for (int i = 0; i <= size; i++) {
            if (i == size || subscriberMethod.priority > subscriptions.get(i).subscriberMethod.priority) {
                subscriptions.add(i, newSubscription);
                break;
            }
        }

        //其次再进行[订阅者] 到 [订阅事件]的映射。获取注册对象的订阅事件集合
        List<Class<?>> subscribedEvents = typesBySubscriber.get(subscriber);
        if (subscribedEvents == null) {
            //新建订阅对象的订阅事件集合队列。
            subscribedEvents = new ArrayList<>();
            typesBySubscriber.put(subscriber, subscribedEvents);
        }
        //将当前订阅的事件类型添加到队列中
        subscribedEvents.add(eventType);

        //下面就是对粘性事件的操作,新注册的对象,如果接受粘性事件,那么将之前发送过的粘性事件再发送给现在注册的粘性订阅者
        if (subscriberMethod.sticky) {
            if (eventInheritance) {
                // Existing sticky events of all subclasses of eventType have to be considered.
                // Note: Iterating over all events may be inefficient with lots of sticky events,
                // thus data structure should be changed to allow a more efficient lookup
                // (e.g. an additional map storing sub classes of super classes: Class -> List<Class>).
                Set<Map.Entry<Class<?>, Object>> entries = stickyEvents.entrySet();
                for (Map.Entry<Class<?>, Object> entry : entries) {
                    Class<?> candidateEventType = entry.getKey();
                    if (eventType.isAssignableFrom(candidateEventType)) {
                        Object stickyEvent = entry.getValue();
                        checkPostStickyEventToSubscription(newSubscription, stickyEvent);
                    }
                }
            } else {
                Object stickyEvent = stickyEvents.get(eventType);
                checkPostStickyEventToSubscription(newSubscription, stickyEvent);
            }
        }
    }
看到这里,订阅对象已经注册到事件中线中了。本篇暂不对事件的分发展开探究。
2.2、解注册订阅者
解注册一个从来没被注册的对象并不会抛出异常,反而重复注册一个对象会抛出重复注册的异常。通过isRegistered(Object subscriber)方法判断一个对象是否被注册到EventBus中,其实就是判断在不在typesBySubscriber映射中:
    public synchronized boolean isRegistered(Object subscriber) {
        return typesBySubscriber.containsKey(subscriber);
}订阅者的解注册,就是将订阅对象及对应的订阅事件类型从typesBySubscriber中删除。
    /** Unregisters the given subscriber from all event classes. */
    public synchronized void unregister(Object subscriber) {
        //需要取消订阅的这个对象,有对应多少个事件,前面注册的时候添加进来的
        List<Class<?>> subscribedTypes = typesBySubscriber.get(subscriber);
        if (subscribedTypes != null) {
            //遍历所有这个订阅者的订阅事件
            for (Class<?> eventType : subscribedTypes) {
                unsubscribeByEventType(subscriber, eventType);
            }
            //从typesBySubscriber映射中删除
            typesBySubscriber.remove(subscriber);
        } else {
            logger.log(Level.WARNING, "Subscriber to unregister was not registered before: " + subscriber.getClass());
        }
}再根据事件类型从subscriptionsByEventType拿到这个事件的所有订阅者,并从中删除当前需要取消订阅的对象:
    /** Only updates subscriptionsByEventType, not typesBySubscriber! Caller must update typesBySubscriber. */
    private void unsubscribeByEventType(Object subscriber, Class<?> eventType) {
        //从subscriptionsByEventType映射中获取所有这种事件类型的订阅者
        List<Subscription> subscriptions = subscriptionsByEventType.get(eventType);
        if (subscriptions != null) {
            int size = subscriptions.size();
            for (int i = 0; i < size; i++) {
                Subscription subscription = subscriptions.get(i);
                //这个事件的从订阅者中删除取消订阅的订阅者
                if (subscription.subscriber == subscriber) {
                    subscription.active = false;
                    subscriptions.remove(i);
                    i--;
                    size--;
                }
            }
        }
    }
上面的两步对开发者来说一点也不陌生,映射和集合的基本操作。
EventBus源码阅热身完毕,先看到这里。后面还有事件的发送、消息处理等等。
推荐阅读