Activity的组成结构
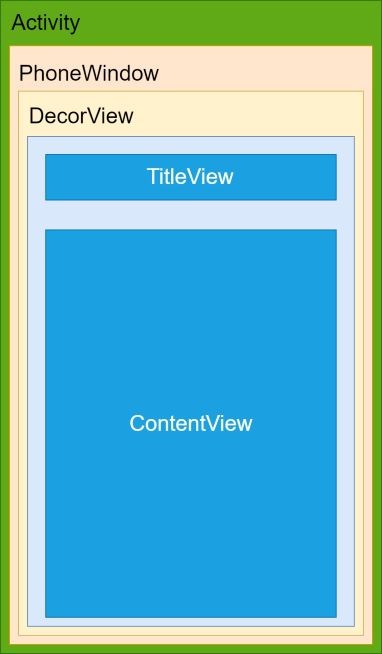
开发中我们重写Activity的onCreate()方法,调用setContentView(int layoutResID)方法给当前Activity设置布局,其实设置的就是ContentView。从setContentView(int layoutResID)开始通过源码来了解一下Activity界面的组成结构(在理解Window中也提到过):
1、Activity
Android框架原生的Activity中setContentView(View view)方法定义如下:
public void setContentView(View view) {
        getWindow().setContentView(view);
        initWindowDecorActionBar();
}getWindow()返回当前Activity持有的的Window成员变量mWindow:
public Window getWindow() {
        return mWindow;
}在Activity启动流程中我们知道在attach()方法中初始化内部的成员变量mWindow:
@UnsupportedAppUsage
    final void attach(Context context, ActivityThread aThread,
            Instrumentation instr, IBinder token, int ident,
            Application application, Intent intent, ActivityInfo info,
            CharSequence title, Activity parent, String id,
            NonConfigurationInstances lastNonConfigurationInstances,
            Configuration config, String referrer, IVoiceInteractor voiceInteractor,
            Window window, ActivityConfigCallback activityConfigCallback, IBinder assistToken) {
        attachBaseContext(context);
        mFragments.attachHost(null /*parent*/);
        mWindow = new PhoneWindow(this, window, activityConfigCallback);
        ...
}Window抽象类的实现是PhoneWindow类,在框架com.android.internal.policy包中。Window中的setContentView(int layoutResID)抽象方法实现如下:
@Override
    public void setContentView(int layoutResID) {
        if (mContentParent == null) {
            installDecor();
        } else if (!hasFeature(FEATURE_CONTENT_TRANSITIONS)) {
            mContentParent.removeAllViews();
        }
        if (hasFeature(FEATURE_CONTENT_TRANSITIONS)) {
            final Scene newScene = Scene.getSceneForLayout(mContentParent, layoutResID,
                    getContext());
            transitionTo(newScene);
        } else {
            mLayoutInflater.inflate(layoutResID, mContentParent);
        }
        mContentParent.requestApplyInsets();
        final Callback cb = getCallback();
        if (cb != null && !isDestroyed()) {
            cb.onContentChanged();
        }
        mContentParentExplicitlySet = true;
}mContentParent就是放置Activity布局内容的地方
// This is the view in which the window contents are placed. It is either
    // mDecor itself, or a child of mDecor where the contents go.
ViewGroup mContentParent;Activity的onCreate()中调用setContentView()时,mContentParent是null,所以走installDecor()方法,完整的方法一百多行,只关注重点逻辑:
private void installDecor() {
        mForceDecorInstall = false;
        if (mDecor == null) {
            //mDecor null走这里
            mDecor = generateDecor(-1);
            ...
        } else {
            mDecor.setWindow(this);
        }
        if (mContentParent == null) {
            //mContentParent null走这里
            mContentParent = generateLayout(mDecor);
        ...
}已经知道mDecor是null,调用generateDecor(int featureId)方法创建当前Activity的DecorView。在DecorView添加到Window中的流程一文中,DecorView添加到Window的时候也用到此方法生成DecorView实例(如果还未被创建的话)。
protected DecorView generateDecor(int featureId) {
        // System process doesn't have application context and in that case we need to directly use
        // the context we have. Otherwise we want the application context, so we don't cling to the
        // activity.
        Context context;
        if (mUseDecorContext) {
            Context applicationContext = getContext().getApplicationContext();
            if (applicationContext == null) {
                context = getContext();
            } else {
                context = new DecorContext(applicationContext, this);
                if (mTheme != -1) {
                    context.setTheme(mTheme);
                }
            }
        } else {
            context = getContext();
        }
        return new DecorView(context, featureId, this, getAttributes());
}同样mContentParent是null,调用generateLayout(DecorView decor)方法。框架的方法都很长,这个方法315行。只需关注其中content内容加载的代码段:
protected ViewGroup generateLayout(DecorView decor) {
        ...
        // Inflate the window decor.
        int layoutResource;
        int features = getLocalFeatures();
        // System.out.println("Features: 0x" + Integer.toHexString(features));
        if ((features & ((1 << FEATURE_LEFT_ICON) | (1 << FEATURE_RIGHT_ICON))) != 0) {
            if (mIsFloating) {
                TypedValue res = new TypedValue();
                getContext().getTheme().resolveAttribute(
                        R.attr.dialogTitleIconsDecorLayout, res, true);
                layoutResource = res.resourceId;
            } else {
                layoutResource = R.layout.screen_title_icons;
            }
            // XXX Remove this once action bar supports these features.
            removeFeature(FEATURE_ACTION_BAR);
            // System.out.println("Title Icons!");
        } else if ((features & ((1 << FEATURE_PROGRESS) | (1 << FEATURE_INDETERMINATE_PROGRESS))) != 0
                && (features & (1 << FEATURE_ACTION_BAR)) == 0) {
            // Special case for a window with only a progress bar (and title).
            // XXX Need to have a no-title version of embedded windows.
            layoutResource = R.layout.screen_progress;
            // System.out.println("Progress!");
        } else if ((features & (1 << FEATURE_CUSTOM_TITLE)) != 0) {
            // Special case for a window with a custom title.
            // If the window is floating, we need a dialog layout
            if (mIsFloating) {
                TypedValue res = new TypedValue();
                getContext().getTheme().resolveAttribute(
                        R.attr.dialogCustomTitleDecorLayout, res, true);
                layoutResource = res.resourceId;
            } else {
                layoutResource = R.layout.screen_custom_title;
            }
            // XXX Remove this once action bar supports these features.
            removeFeature(FEATURE_ACTION_BAR);
        } else if ((features & (1 << FEATURE_NO_TITLE)) == 0) {
            // If no other features and not embedded, only need a title.
            // If the window is floating, we need a dialog layout
            if (mIsFloating) {
                TypedValue res = new TypedValue();
                getContext().getTheme().resolveAttribute(
                        R.attr.dialogTitleDecorLayout, res, true);
                layoutResource = res.resourceId;
            } else if ((features & (1 << FEATURE_ACTION_BAR)) != 0) {
                layoutResource = a.getResourceId(
                        R.styleable.Window_windowActionBarFullscreenDecorLayout,
                        R.layout.screen_action_bar);
            } else {
                layoutResource = R.layout.screen_title;
            }
            // System.out.println("Title!");
        } else if ((features & (1 << FEATURE_ACTION_MODE_OVERLAY)) != 0) {
            layoutResource = R.layout.screen_simple_overlay_action_mode;
        } else {
            // Embedded, so no decoration
            is needed.
            layoutResource = R.layout.screen_simple;
        }
        ...
        return contentParent;
}上面这一大段代码主要是框架根据不同的属性配置加载不同的框架布局(这里不展开了讲了,涉及很多知识点,比如设置自定义Title就加载R.layout.screen_custom_title布局)。Android框架中的布局文件放在/frameworks/base/core/res/res/layout中,以其中R.layout.screen_title为例:
<LinearLayout xmlns:android="http://schemas.android.com/apk/res/android"
        android:orientation="vertical"
        android:fitsSystemWindows="true">

        <!-- Popout bar for action modes -->
        <ViewStub android:id="@+id/action_mode_bar_stub"
                  android:inflatedId="@+id/action_mode_bar"
                  android:layout="@layout/action_mode_bar"
                  android:layout_width="match_parent"
                  android:layout_height="wrap_content"
                  android:theme="?attr/actionBarTheme" />

        <FrameLayout
            android:layout_width="match_parent"
            android:layout_height="?android:attr/windowTitleSize"
            style="?android:attr/windowTitleBackgroundStyle">
            <TextView android:id="@android:id/title"
                style="?android:attr/windowTitleStyle"
                android:background="@null"
                android:fadingEdge="horizontal"
                android:gravity="center_vertical"
                android:layout_width="match_parent"
                android:layout_height="match_parent" />
        </FrameLayout>

        <FrameLayout android:id="@android:id/content"
            android:layout_width="match_parent"
            android:layout_height="0dip"
            android:layout_weight="1"
            android:foregroundGravity="fill_horizontal|top"
            android:foreground="?android:attr/windowContentOverlay" />

</LinearLayout>R.layout.screen_title根布局是LinearLayout,里面包含了1个ViewStub 和2个 FrameLayout:
①ViewStub用来显示ActionBar。
②第一个FrameLayout,包含一个TextView,用来显示标题,
③下面一个FrameLayout是content,用来显示内容
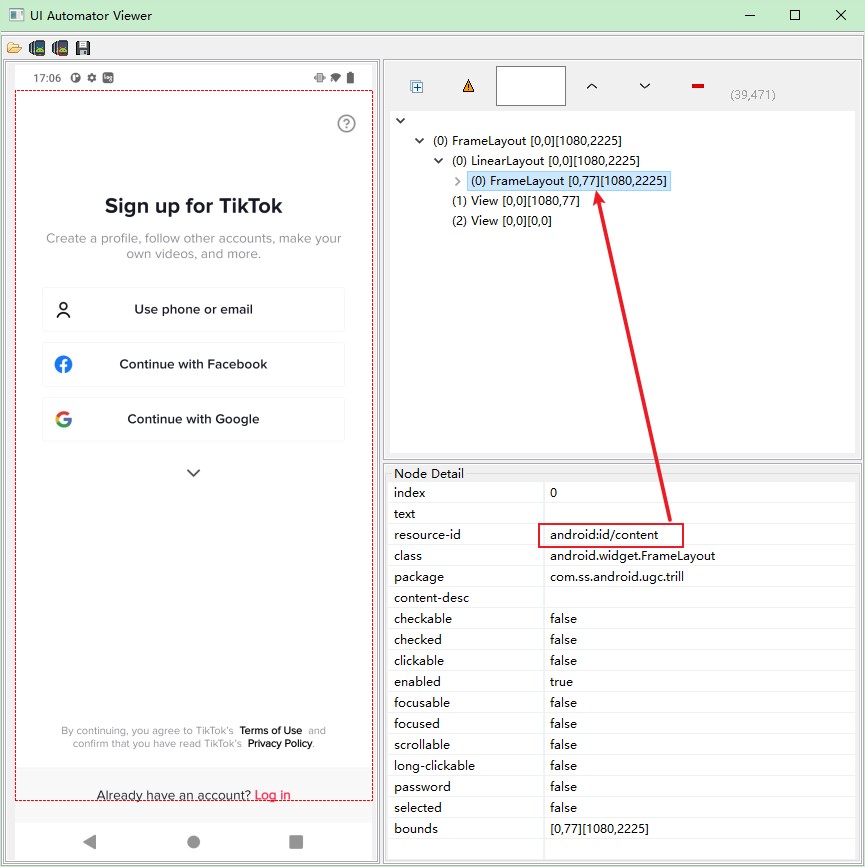
构成了我们所见到的Activity,随便找一个应用的Activity抓一下看看界面组成是不是这样:Tik Tok的登陆界面如下
2、AppCompatActivity
现在绝大多数项目都不会直接用原生的Activity,而是继承自AndroidX库中的AppCompatActivity,AppCompatActivity中setContentView(int layoutResID)方法则是通过代理的方式设置布局:
@Override
    public void setContentView(@LayoutRes int layoutResID) {
        getDelegate().setContentView(layoutResID);
}mDelegate是AppCompatActivity类中的AppCompatDelegate类型成员变量,通过getDelegate()方法获取实例:
@NonNull
    public AppCompatDelegate getDelegate() {
        if (mDelegate == null) {
            mDelegate = AppCompatDelegate.create(this, this);
        }
        return mDelegate;
}AppCompatDelegate是抽象类,它的实现类是AppCompatDelegateImpl。AppCompatDelegate中的create()静态方法直接创建对应的实例:
@NonNull
    public static AppCompatDelegate create(@NonNull Activity activity,
            @Nullable AppCompatCallback callback) {
        return new AppCompatDelegateImpl(activity, callback);
}AppCompatDelegateImpl实现了AppCompatDelegate中的setContentView(int resId)等众多抽象方法:
@Override
    public void setContentView(int resId) {
        ensureSubDecor();
        ViewGroup contentParent = mSubDecor.findViewById(android.R.id.content);
        contentParent.removeAllViews();
        LayoutInflater.from(mContext).inflate(resId, contentParent);
        mAppCompatWindowCallback.getWrapped().onContentChanged();
}通过mSubDecor找到内部id为content的View,将传入的布局id加载给对应的View初始化,虽然和框架原生的Activity设置content方式有很大不同,但是殊途同归。
相关资料:
文档 > 指南 > Activity 简介">Android 开发者 > 文档 > 指南 > Activity 简介
/frameworks/base/core/java/android/app/Activity.java