Volley请求队列RequestQueue
Volley将所有的网络请求通过RequestQueue内部进行管理,这是一个很内敛的设计思想,先从Volley的入口开始颇析。
1、创建请求队列
通过Volley进行网络请求,首先得获取这个网络请求队列RequestQueue。
1.1、通过Volley newRequestQueue(...)方法
在Volley使用介绍一文中,我们通过Volley类提供的静态方法创建RequestQueue实例。
public static RequestQueue newRequestQueue(Context context) {
        return newRequestQueue(context, (BaseHttpStack) null);
}该方法直接调用Volley的另一个静态方法newRequestQueue(Context context, BaseHttpStack stack),源码解析如下:
public static RequestQueue newRequestQueue(Context context, BaseHttpStack stack) {
        BasicNetwork network;
        //如果传入的BaseHttpStack为null,那么就创建一个新的HurlStack类型
        if (stack == null) {
            if (Build.VERSION.SDK_INT >= 9) {
                network = new BasicNetwork(new HurlStack());
            } else {
                // Prior to Gingerbread, HttpUrlConnection was unreliable.
                // See: http://android-developers.blogspot.com/2011/09/androids-http-clients.html
                // At some point in the future we'll move our minSdkVersion past Froyo and can
                // delete this fallback (along with all Apache HTTP code).
                String userAgent = "volley/0";
                try {
                    String packageName = context.getPackageName();
                    PackageInfo info =
                            context.getPackageManager().getPackageInfo(packageName, /* flags= */ 0);
                    userAgent = packageName + "/" + info.versionCode;
                } catch (NameNotFoundException e) {
                }
                network =
                        new BasicNetwork(
                                new HttpClientStack(AndroidHttpClient.newInstance(userAgent)));
            }
        } else {
            //传入的BaseHttpStack非空,就用该BaseHttpStack实例构造BasicNetwork网络请求管理对象
            network = new BasicNetwork(stack);
        }
        return newRequestQueue(context, network);
}最后调用方法newRequestQueue(Context context, Network network)内部直接创建RequestQueue实例,启动队列并返回实例。传入Context的目的只是为了获取应用的缓存目录,所以最好使用Application 作为Context传入,关于应用的目录详见Android中的各种目录。这里默认使用DiskBasedCache。
private static RequestQueue newRequestQueue(Context context, Network network) {
        File cacheDir = new File(context.getCacheDir(), DEFAULT_CACHE_DIR);
        RequestQueue queue = new RequestQueue(new DiskBasedCache(cacheDir), network);
        queue.start();
        return queue;
}Volley内部几个静态方法调用关系如下:
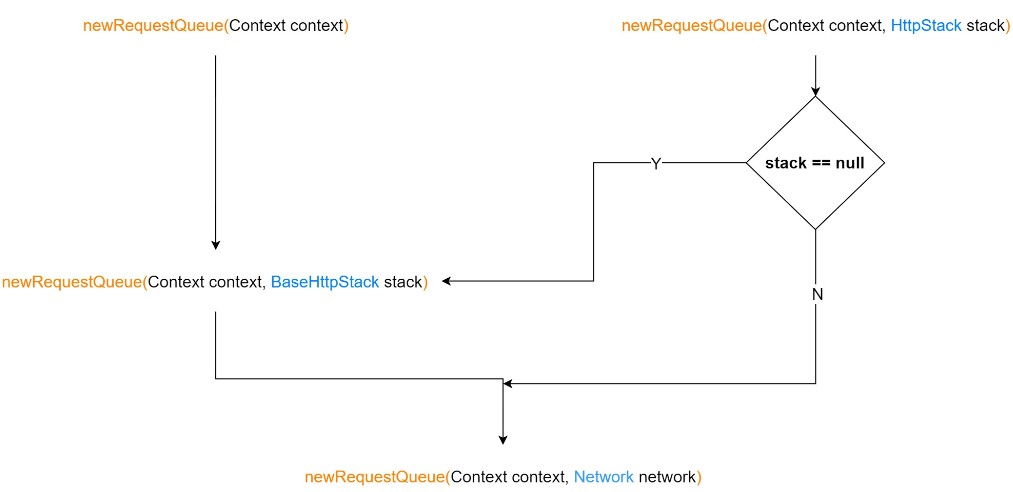
最终都是通过RequestQueue构造函数创建请求队列。接下来看看RequestQueue构造函数。
1.2、通过RequestQueue构造函数
前面通过Volley类中的newRequestQueue(Context context, Network network)方法获取请求队列,使用的构造函数如下:
public RequestQueue(Cache cache, Network network) {
        this(cache, network, DEFAULT_NETWORK_THREAD_POOL_SIZE);
}使用默认的网络请求线程池数量DEFAULT_NETWORK_THREAD_POOL_SIZE调用另一个构造方法:
public RequestQueue(Cache cache, Network network, int threadPoolSize) {
        this(
                cache,
                network,
                threadPoolSize,
                //创建默认的分发器,开发者也可以自行设计
                new ExecutorDelivery(new Handler(Looper.getMainLooper())));
}接着创建一个默认的请求结果分发器ExecutorDelivery,注意获取的是主线程Looper,回调运行在主线程,后面会分析到。
public RequestQueue(
            Cache cache, Network network, int threadPoolSize, ResponseDelivery delivery) {
        mCache = cache;
        mNetwork = network;
        //创建传入线程池数量大小的网络请求分发器,这里默认是4个工作线程
        mDispatchers = new NetworkDispatcher[threadPoolSize];
        mDelivery = delivery;
}通过RequestQueue构造函数创建实例涉及到的成员变量如下,这些后面都是会用到的:
/** Number of network request dispatcher threads to start. */
    private static final int DEFAULT_NETWORK_THREAD_POOL_SIZE = 4;

    /** Cache interface for retrieving and storing responses. */
    private final Cache mCache;

    /** Network interface for performing requests. */
    private final Network mNetwork;

    /** Response delivery mechanism. */
    private final ResponseDelivery mDelivery;

    /** The network dispatchers. */
    private final NetworkDispatcher[] mDispatchers;
2、请求队列启动和停止
2.1、启动请求队列
通过Volley类中的newRequestQueue(Context context, Network network)方法获取请求队列,方法中自动开启了请求队列:
private static RequestQueue newRequestQueue(Context context, Network network) {
        File cacheDir = new File(context.getCacheDir(), DEFAULT_CACHE_DIR);
        RequestQueue queue = new RequestQueue(new DiskBasedCache(cacheDir), network);
        //启动队列
        queue.start();
        return queue;
}看到这个start()方法,还以为RequestQueue继承自Thread呢,其实不是。start()方法如下:
/** Starts the dispatchers in this queue. */
    public void start() {
        stop(); // Make sure any currently running dispatchers are stopped.

        // 创建缓存调度程序并启动它。
        mCacheDispatcher = new CacheDispatcher(mCacheQueue, mNetworkQueue, mCache, mDelivery);
        mCacheDispatcher.start();

        // 创建不超过池大小的网络调度程序(和相应的线程)。
        for (int i = 0; i < mDispatchers.length; i++) {
            NetworkDispatcher networkDispatcher =
                    new NetworkDispatcher(mNetworkQueue, mNetwork, mCache, mDelivery);
            mDispatchers[i] = networkDispatcher;
            networkDispatcher.start();
        }

}创建一个CacheDispatcher缓存调度程序,如果缓存没有的话就将请求放到网络请求队列中处理,这是后话了,后面分析缓存和网络请求再说。
再创建和构造时传入的线程池数量threadPoolSize相当的网络请求调度程序NetworkDispatcher。CacheDispatcher和NetworkDispatcher都是继承自Thread。
2.2、停止请求队列
相应的请求队列需要关闭。这里分别关闭了缓存CacheDispatcher和NetworkDispatcher。
/** Stops the cache and network dispatchers. */
    public void stop() {

        if (mCacheDispatcher != null) {
            mCacheDispatcher.quit();
        }

        for (final NetworkDispatcher mDispatcher : mDispatchers) {
            if (mDispatcher != null) {
                mDispatcher.quit();
            }
        }
    }
3、添加请求
获取到Volley的请求队列后,调用add(Request<T> request)方法向里面添加业务中构造好的请求:
/**
     * Adds a Request to the dispatch queue.
     *
     * @param request The request to service
     * @return The passed-in request
     */
    public <T> Request<T> add(Request<T> request) {
        // Tag the request as belonging to this queue and add it to the set of current requests.
        request.setRequestQueue(this);
        synchronized (mCurrentRequests) {
            mCurrentRequests.add(request);
        }
        // Process requests in the order they are added.
        request.setSequence(getSequenceNumber());
        request.addMarker("add-to-queue");
        sendRequestEvent(request, RequestEvent.REQUEST_QUEUED);
        beginRequest(request);
        return request;
}接着调用beginRequest(Request<T> request)方法判断当前Request是否需要缓存,如果需要缓存则将其放入缓存队列mCacheQueue中,先从缓存中获取数据,如果缓存中没有再将其放入网络请求队列中(后面看源码会看到这部分逻辑)。
<T> void beginRequest(Request<T> request) {
        // If the request is uncacheable, skip the cache queue and go straight to the network.
        if (!request.shouldCache()) {
            sendRequestOverNetwork(request);
        } else {
            mCacheQueue.add(request);
        }
}如果不需要缓存就通过sendRequestOverNetwork(Request<T> request)将Request放到网络请求队列mNetworkQueue中:
<T> void sendRequestOverNetwork(Request<T> request) {
        mNetworkQueue.add(request);
}关于Volley中的RequestQueue请求队列就到这里,下面该继续深挖一下CacheDispatcher和NetworkDispatcher。