LayoutParams初始化流程
在View布局参数LayoutParams一文中对布局参数有了详细的了解。用getLayoutParams()方法获取View的布局参数:
    public ViewGroup.LayoutParams getLayoutParams() {
        return mLayoutParams;
} 每个View中的mLayoutParams实例可以通过setLayoutParams(ViewGroup.LayoutParams params)方法设置的:
    public void setLayoutParams(ViewGroup.LayoutParams params) {
        ...
        mLayoutParams = params;
        ...
        requestLayout();
} 不需要为View初始化mLayoutParams实例,因为这是View所在容器(ViewGroup)的职责。接下来,就跟随源码,了解View中的LayoutParams初始化。
1、向容器添加View
最常见的是通过XML的方式进行布局,也可以直接用代码动态向界面添加View。比如用addView(View child)方法:
    TextView textView = new TextView(context);
    ...
    parent.addView(textView);
当用addView(View child)方法将子View添加到容器的过程中,父容器就会调用构造LayoutParams的相关方法并设置给子View。
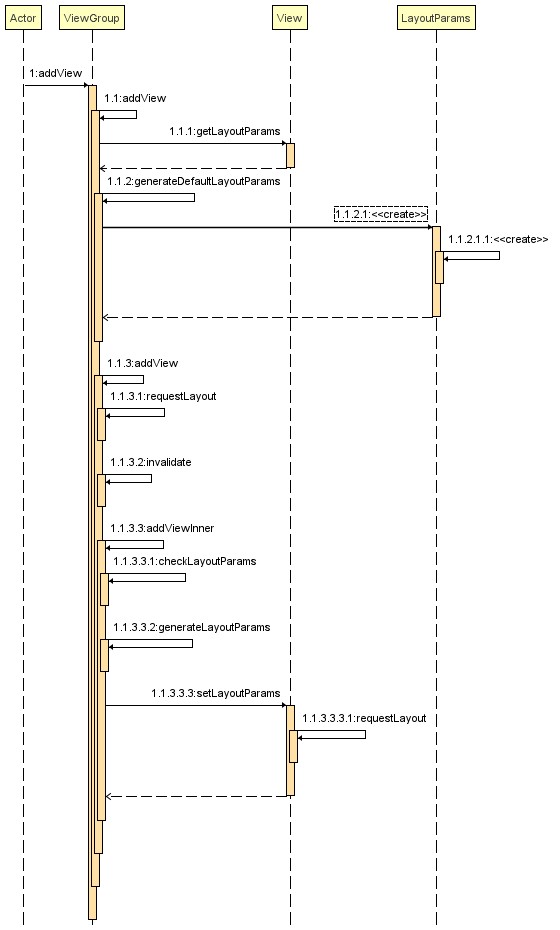
1.1、addView()流程图
先看一下添加View整体的流程。手动画时序图太费时间,直接用SequenceDiagram插件生成了。该插件用法见SequenceDiagram:一键生成时序图一文。
1.2、addView()源码流程
addView()方法有多个重载,从addView(View child)方法入口开始:
    public void addView(View child) {
        addView(child, -1);
} addView(View child, int index)方法中有两个判断:一是添加到容器中的子View不能为空;二是子View的布局参数如果为空,父容器就会生成一个LayoutParams并作为参数后续设置给子View。
    public void addView(View child, int index) {
        if (child == null) {
            throw new IllegalArgumentException("Cannot add a null child view to a ViewGroup");
        }
        LayoutParams params = child.getLayoutParams();
        if (params == null) {
            params = generateDefaultLayoutParams();
            if (params == null) {
                throw new IllegalArgumentException(
                        "generateDefaultLayoutParams() cannot return null");
            }
        }
        addView(child, index, params);
} 随后调用addView(View child, int index,params)方法,在该方法里会先于子View更新容器的布局、并使绘图缓存失效。
    public void addView(View child, int index, LayoutParams params) {
        ...
        requestLayout();
        invalidate(true);
        //注意这里不会阻止刷新布局,每当addView都会更新子布局
        addViewInner(child, index, params, false);
} 添加子View最终调用的方法是addViewInner(View child, index, params,preventRequestLayout),在该方法里会将addView(View child, int index)方法中传入的LayoutParams通过View的setLayoutParams(params)方法设置给子View,注意preventRequestLayout参数值为false,不会阻止子View请求跟新布局。
    private void addViewInner(View child, int index, LayoutParams params,
            boolean preventRequestLayout) {
        ...
        if (!checkLayoutParams(params)) {
            params = generateLayoutParams(params);
        }
        if (preventRequestLayout) {
            //直接赋值可能不会使布局参数生效
            child.mLayoutParams = params;
        } else {
            //走这里
            child.setLayoutParams(params);
        }
        ...
} 在上面的方法中就用到了本篇开头提到的View中的setLayoutParams(params)方法,容器中子View的布局参数就这样被设置初始化了。
    public void setLayoutParams(ViewGroup.LayoutParams params) {
        if (params == null) {
            throw new NullPointerException("Layout parameters cannot be null");
        }
        mLayoutParams = params;
        resolveLayoutParams();
        if (mParent instanceof ViewGroup) {
            ((ViewGroup) mParent).onSetLayoutParams(this, params);
        }
        requestLayout();
    }
2、解析布局文件
那么通过XML文件解析出来的布局,这里面View的布局参数又是如何初始化的?比直接通过代码addView(View child)添加View,多了一步解析XML的过程,但最后还是需要用addView(View child)方法将解析出来的View添加到容器中。以一条简单的解析xml布局流程为例:
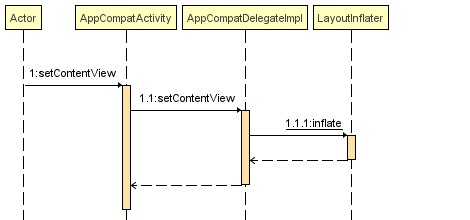
2.1、setContentView()设置布局
不管设置XML布局用的是AppCompatActivity中的setContentView(int layoutResID)方法:
    @Override
    public void setContentView(@LayoutRes int layoutResID) {
        getDelegate().setContentView(layoutResID);
    }
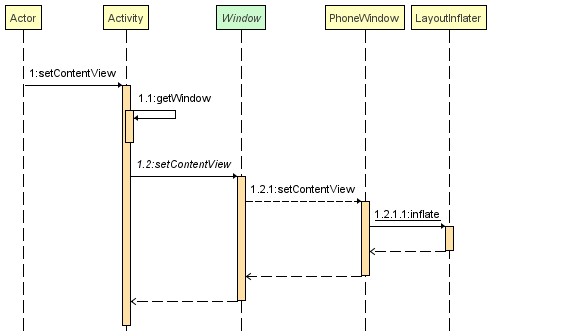
还是直接用Activity的setContentView(int layoutResID)方法:
    public void setContentView(@LayoutRes int layoutResID) {
        getWindow().setContentView(layoutResID);
        initWindowDecorActionBar();
    }
最后,都是通过LayoutInflater解析布局。
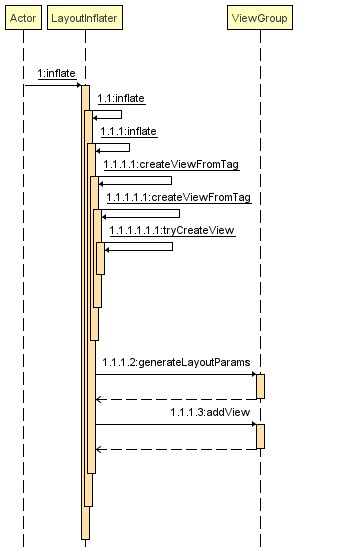
2.2、LayoutInflater解析布局
从LayoutInflater的inflate(int resource,ViewGroup root)方法开始解析布局
    public View inflate(@LayoutRes int resource, @Nullable ViewGroup root) {
        return inflate(resource, root, root != null);
} 传入的根视图不为空,就会将解析出的view附加到root中。显然,这里的attachToRoot参数值为true。
    public View inflate(@LayoutRes int resource, @Nullable ViewGroup root, boolean attachToRoot) {
        final Resources res = getContext().getResources();
        ...
        View view = tryInflatePrecompiled(resource, res, root, attachToRoot);
        if (view != null) {
            return view;
        }
        XmlResourceParser parser = res.getLayout(resource);
        try {
            return inflate(parser, root, attachToRoot);
        } finally {
            parser.close();
        }
    }
解析XML的具体过程先不看,了解大体的解析流程和思路,及解析出来的根View如何处理。子view的解析流程类似。
    public View inflate(XmlPullParser parser, @Nullable ViewGroup root, boolean attachToRoot) {
        synchronized (mConstructorArgs) {
            ...
            View result = root;
            try {
                advanceToRootNode(parser);
                final String name = parser.getName();
                //<merge/>用法注意事项:根层级必须为ViewGroup,且attach到根视图中
                if (TAG_MERGE.equals(name)) {
                    if (root == null || !attachToRoot) {
                        throw new InflateException("<merge /> can be used only with a valid "
                                + "ViewGroup root and attachToRoot=true");
                    }
                    rInflate(parser, root, inflaterContext, attrs, false);
                } else {
                    // temp 是在 xml 中找到的根视图
                    final View temp = createViewFromTag(root, name, inflaterContext, attrs);
                    ViewGroup.LayoutParams params = null;

                    if (root != null) {
                        // 创建与根匹配的布局参数(如果提供)
                        params = root.generateLayoutParams(attrs);
                        if (!attachToRoot) {
                            //如果子view不附加到根视图中,那么为temp设置布局参数.
                            //(如果需要attach到根试图,会在下面通过addView方法添加)
                            temp.setLayoutParams(params);
                        }
                    }

                    //解析所有子View
                    rInflateChildren(parser, temp, attrs, true);

                    // 将解析出来的View附加到root中
                    if (root != null && attachToRoot) {
                        root.addView(temp, params);
                    }

                    // 决定是返回传入的root还是xml中解析出来的顶层视图。
                    if (root == null || !attachToRoot) {
                        result = temp;
                    }
                }
            }
            ...
            return result;
        }
} 最终解析出来的XML根布局被添加到哪里去了?其实是被添加到PhoneWindow中的mContentParent容器中。
    // This is the view in which the window contents are placed. It is either
    // mDecor itself, or a child of mDecor where the contents go.
    ViewGroup mContentParent;
对PhoneWindow中的installDecor()这个方法还有没有印象?详见DecorView添加到Window中的流程一文的第2节:DecorView的创建。